Over the coming weeks, we will be releasing a four-part guide on how to make your very own hammock using para cord. This excellent step-by-step tutorial was very kindly supplied by Woodlorean John van Zanen of the Netherlands; thank you!
We’ve split the guide into four different sections, allowing you to have a go at each stage before the next set of instructions is released. Today we have Part 1; we hope you enjoy this guide and would love to hear from anyone that gives it a go.
Part 1:
It is always very rewarding to make your own kit. When I finished the Camp Craft course at Woodlore I decided to make a hammock. I learnt making a hammock using this technique when I was a boy scout and it was quite a long time ago since I had made my last one. But when you are living in a fixed camp a hammock is a useful item. It not only gives you a place to sleep at night but also a place to sit during the day and it adds comfort to the times you spend outdoors.
This is an easy technique and you don’t have to be a knots expert to try to make this sort of hammock. So during the construction of my latest project this summer I took some pictures while I was working and translated the instructions they gave me as a boy scout into English. I hope this guide will inspire my fellow Woodloreans to make their own project. Good luck.
What do you need?
- Sisal rope, two wire, about 1 kilo (when using paracord you will need about 230 meters depending on the length of the hammock)
- Two pieces of wood from 2.6 cm by 1.8 cm by 70 cm long (or just two pieces of wood from nature)
- Two steel rings (optional)
- A shelf or board of about 24 to 110 cm
- Sixty-six nails of 6.5 cm
- Stick or broomstick of about 120 cm
- Tape
Preparing your work board:
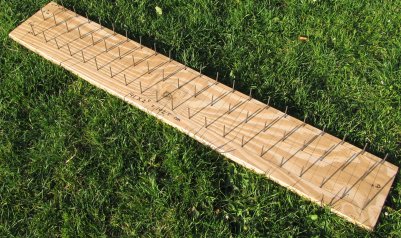
Draw the pattern in figure 1 on the shelf and hit the nails into the board at the spots marked with the dots. Remove the heads from the nails with a pair of pliers. Also, drive a nail in the board at the site of cross B. The nails have to stick about 4 cm out of the board. Be careful for nails that protrude below the shelf! Treat the top of the nails with a file and sandpaper and remove the sharp edges to save your hands and your rope.
Start with the knots:
Now that the work board is done, get the (sisal) rope. The rope is usually divided into pieces 3 to 5 meters long. When you start, put some adhesive tape at the working end of your rope to prevent fraying and for convenience during the making of the knots. I myself have a habit of working with longer pieces (15 to 20 meters) because you finally have fewer “welds” or knots in your rope. It will take longer before a knot is finished because of the length of the rope, but at the end I find the result more attractive. See what you like. If you would like to use longer pieces it is a smart thing to hank the ropes like Ray does with his hootchie guy lines. Tips for that you will find on page 154 of Ray’s book Essential Bushcraft.
Connecting loose pieces of rope:
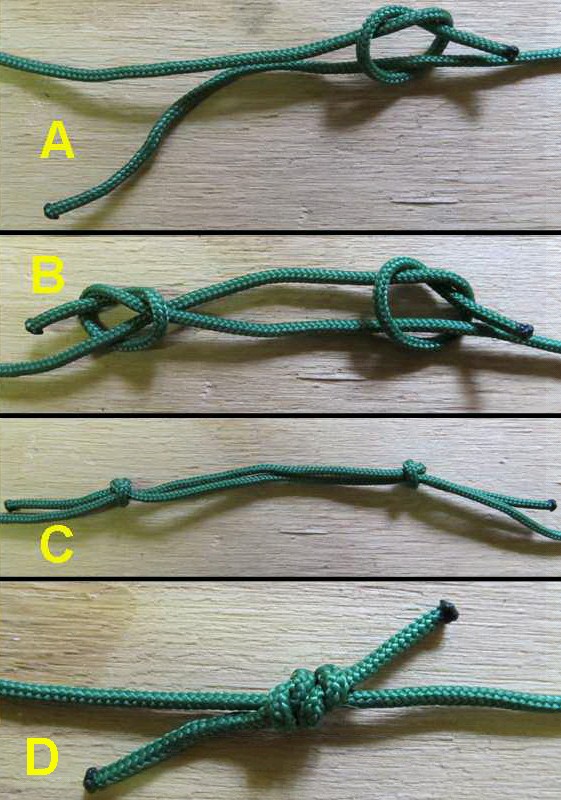
To join two pieces of rope, the simplest way is to use the Fishermans Knot (see Figure 2):


Wouldn’t it be easier to use finishing nails instead of popping off the heads of regular nails with pliers?
LikeLike
Yes hammocks are great I also made my own using light weight fabrics and I have also insulated it so I can use the hammock in winter, with a light weight tarp to protect me from wind, rain and snow. When the weather is good either remove the tarp or set it up so you can watch the sun rise and set. 🙂
LikeLike
good one John hope to see the rest of the article soon. though i do prefer the hammock i bought
LikeLike
About 3 years ago I was fascinated by the hammocks that Ray and his friends used in some of his TV programmes. However the web site always seemed to be out-of-stock, so I decided to make my own. The pattern was devised from watching the programmes and doing a little bit of maths (catenary lengths). The materials were basically nylon sheet, climbing tape, two metal rings, and strong nylon thread. There was also some mosquito netting, and that was used to provide protection whilst asleep. It was all sown up on an ancient Singer sewing machine.
Nowadays I use the hammock and mosquito net occasionally for my camps, depending on company, time of year and terrain. The roof is a tarp I bought from Ray’s web site. The arrangement is perfect for irregular ground with trees, provided that the wind speeds are low.
Having made a netting needle recently I will be interested to see how the knots work out in the rest of this article. Fishermens’ nets generally use the sheetbend, which is readily formed with such a needle. There is a description of the process in The Ashley Book of Knots.
LikeLike
Wow! Really good post John, Really looking forward to the rest!
LikeLike