
Keeping your tools sharp is important for several reasons. Not only does a sharp tool make carving one of the greatest joys of bushcraft, it is also safer. When working with a blunt tool you have to exert more pressure; this increases the chance of a slip and means that any ensuing cut will be more severe. As such, the ability to sharpen your tools to a razor’s edge is an essential skill. This classic clip from the Bushcraft Survival days shows Ray’s preferred method for sharpening his knives whilst at camp:
In addition to the above video guide, we’ve also included Ray’s written guide below, taken from Essential Bushcraft:
- To sharpen your knife you will need a set of abrasive stones ranging from coarse to fine. At home (or at camp) you can indulge yourself with a set of large bench stones, while in the field you will need a small, lightweight alternative.
- Abrasive stones are manufactured from a wide range of materials. My preference is to use Japanese water stones which work fast and conveniently to give a razor edge. Use three grits: 800 for coarse, 1200 for medium and 6000 for fine. In the field carry a combination 1200/6000 stone sawn in half.
- To use these stones, soak them in water before use. Only use the coarse stone if really necessary, when you have seriously blunted your knife or damaged it.
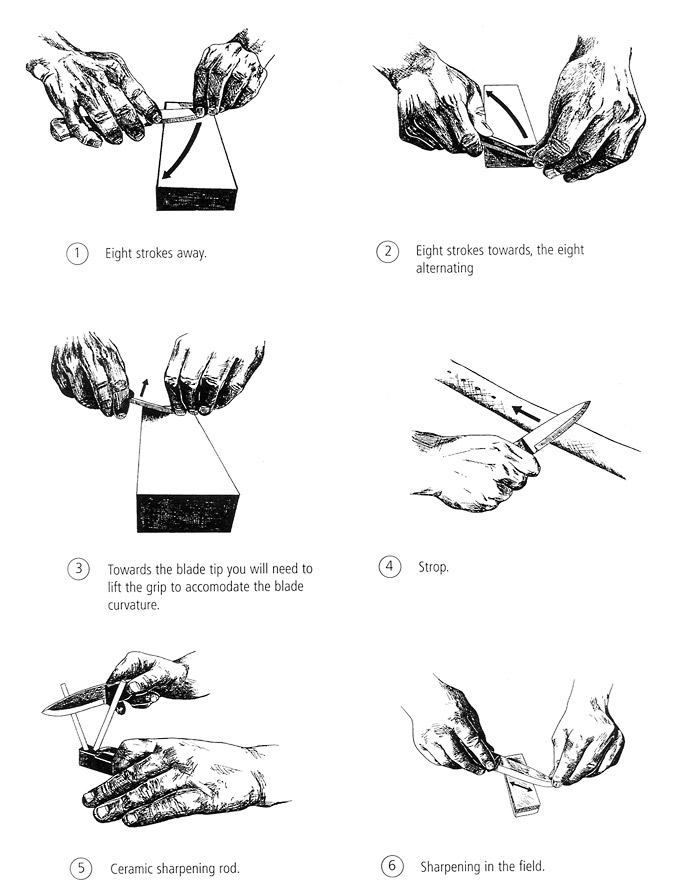
- Lay your knife on the stone and raise the back until the bevel of the blade lies flat on the stone and now push the blade away from you as if trying to cut a thin layer from the top of the stone. Do this eight times before turning the blade over and sharpening the opposite face towards you.
- Now make eight more strokes, alternating the faces of the blade. As you do this a paste will form on the stone, do not wipe this away as it helps to speed up the process; keep the stone wet by splashing it with water throughout the process.
- Move on to a finer stone and repeat the process. The 6000 grit stone need not be soaked, just wetted; preferably create a slurry on the stone prior to use with a small nagura stone (these are specially made for the purpose and can be purchased with your stones).
- After using the 6000 stone clean the blade, then strop it on the inside of a leather belt 50 times, alternating the blade face on each stroke. This will help to ensure a sharp and durable edge. To complete the process I run the blade very lightly down the finest ceramic sharpening rod to give the edge more bite. If you do not have a ceramic rod use the edge of a car window.
After sharpening your knife it is recommended to apply a thin layer of Camellia Oil to the blade. This oil has been used for centuries in Japan to protect samurai swords, and a small coating will help to keep your blades free from rust and corrosion.
While we hope this guide will be enough to get you started, there is no doubt that the best way to learn this technique is to see it done in person. If you would like some first-hand guidance on this method, please take a look at our following courses:


Pingback: The 12 Best Camping Knives – (Reviews & Buying Guide 2019)
Nice post & I really like the way you are explained here step wise step to sharpen the knife.
LikeLike
Love the post and especially the visuals showing how to use a stone. What’s your take on using a car window to quickly re-align a dull edge? Would be especially useful when in the field, don’t you think?
Look forward to reading more of your stuff!
LikeLike
Excellent post! That illustration is very helpful. A great tool for a beginning referencing proper knife sharpening. Keep up the good work!
LikeLike
What a legend, thanks Ray!
LikeLike